How To Sprout Chickpeas (Step By Step Guide)
Servings: 3 cups
Step by step guide to sprout chickpeas or Garbanzo beans easily at home to maximise the nutrients and make them easier to digest. Enjoy them raw or cooked in salads, curries, stews, soups, traybakes, nourish bowls, burgers, dips and spreads.
Pin Recipe
Print Recipe
Equipment
- Tea towel
Ingredients
- 3/4 cup chickpea sprouting seeds
- 2 cups filtered water or as much needed to fill the sprouting jar, plus extra for rinsing
Instructions
Soaking
- Add the chickpea sprouts to a sprouting jar and fill the jar with filtered water so the chickpeas are covered. The chickpeas will increase in size as they soak so ensure you fill the jar to make sure they stay covered throughout the whole soaking time. Leave to soak for 12 hours.
- After 12 hours, drain the water, then rinse by filling the jar and draining it completely again.
Sprouting
- Leave the chickpeas in a sprouting jar at room temperature inverted on a drip tray to allow any water to drain. Cover the sprouting jar with a tea towel.
- Rinse and drain the chickpeas twice per day (I find first thing in the morning and in the evening the best and most convenient times).
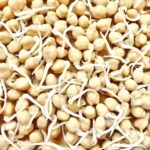
- Repeat this process for 2-4 days. Sprouted chickpeas are ready when a white root has grown from the top of each one that is at least 1/4 inch long.
- After a final rinse and drain transfer the chickpeas to a tray lined with a tea towel or unbleached kitchen towel to dry completely. Remove any unsprouted chickpeas.
Storage
- Once dry, either eat straight away or store in the fridge in a glass container lined with a paper towel for up to 3 days.
Notes
Links. Above links are for US readers. Links for UK readers – chickpea sprouting seeds, sprouting jar, weighing scales, measuring cups, drip tray.
Nutrition. Nutrition information is for 1 cup/120 grams of chickpea sprouts. It's an estimate provided by an online calculator and is only intended for reference only.
Nutrition
Serving: 1cup | Calories: 172kcal | Carbohydrates: 30g | Protein: 13g | Fat: 2.9g | Saturated Fat: 0.43g | Polyunsaturated Fat: 0.75g | Monounsaturated Fat: 0.35g | Sodium: 12mg | Potassium: 472mg | Fiber: 9g | Sugar: 2.9g | Vitamin A: 2IU | Vitamin C: 1.8mg | Calcium: 57mg | Iron: 2.5mg
Tried this recipe?Mention @lbhealthandlifestyle or tag #lbhealthandlifestyle!