
Sprouting chickpeas or garbanzo beans before eating and cooking makes them easier to digest and maximises the nutrient content. This post provides a complete step by step guide on how to sprout chickpeas easily at home, a full list of the benefits, and a variety of ideas and recipes for incorporating them in your diet.
Disclaimer: This post is intended for informational purposes only. This is not intended to constitute or be a substitute for medical advice. Please consult a qualified medical practitioner if you have any health or medical concerns and before making any changes to your diet, lifestyle or treatment plan. Those with a weakened immune system, pregnant women, children and the elderly should always cook sprouted beans thoroughly until they are piping hot before eating them. This post contains affiliate links, meaning at no additional cost to you I will earn commission if you click on a link and make a purchase. As an Amazon Associate I earn from qualifying purchases. See my full disclaimer here.
Jump To Section:-
- What are sprouted chickpeas?
- Benefits of sprouting garbanzo beans before eating
- Sprouted chickpeas nutrition
- Ingredients
- Equipment needed
- How to sprout chickpeas at home
- Tips to sprout chickpeas successfully
- Uses
- Sprouted chickpea recipes
- How to cook sprouted chickpeas
- Frequently asked questions
- Other sprouted recipes
- Recipe card
What Are Sprouted Chickpeas?
Sprouting is an ancient practice that goes back to biblical times, where chickpeas and all other beans, legumes, grains, nuts and seeds before being eaten are soaked and then drained and rinsed twice a day over 2-5 days until they have sprouted where white roots have grown out of the top of them like as detailed below or in these How To Sprout Buckwheat and Activate Nuts and Seeds posts.
Benefits
Chickpeas contain antinutrients, like lectins, phytic acid and saponins, to protect these plant foods and the live enzymes and nutrients inside of them as they’re growing (1). However, if these antinutrients aren’t removed before we cook and eat them then they continue to bind to the nutrients in our food, preventing our body from absorbing them, which over time can lead to deficiencies (1). They can also damage our gut and make them difficult to digest, which can lead to nausea, gas and bloating after consuming them (1).
Soaking and sprouting before consuming them has the following benefits:-
- Reduces the antinutrients, which releases and increases the digestive enzymes contained in them. This makes them easier to digest and reduces the risk of digestive issues after consuming them (2).
- Increases the nutrient content – the protein, fibre, vitamin and mineral content are all maximised (2).
- Transforms the complex carbohydrates into more simple carbohydrates which are easier to digest (2).
- Lowers the glycemic index and load of the food, meaning they reduce the amount our blood sugar increases by after eating them (2).
- All the nutrients become more readily available, which maximises the amount of nutrients our body absorbs (2, 3).
Related Post: 10 Tips To Improve Digestion
Sprouted Chickpeas Nutrition
| Nutrient | Sprouted Chickpeas | Unsprouted Chickpeas |
|---|---|---|
| Calories | 343 kcal | 378 kcal |
| Carbohydrates | 60 grams | 63 grams |
| Protein | 26 grams | 21 grams |
| Fibre | 17 grams | 12 grams |
| Iron | 5.1 mg | 4.3 mg |
| Potassium | 943 mg | 718 mg |
| Calcium | 114 mg | 57 mg |
Related Post: 20 Healthy Food & Drink Swaps
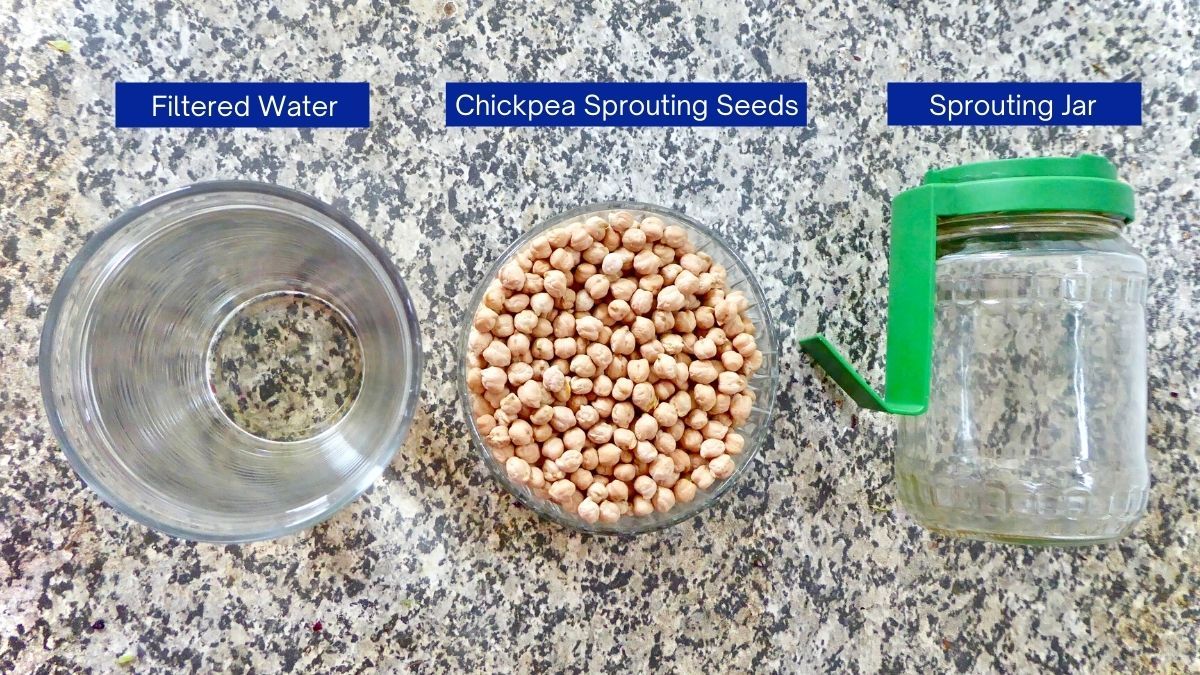
Ingredients Needed
- Chickpea/garbanzo bean sprouting seeds (UK Link/US Link). Ensure you use organic chickpeas made especially for sprouting as they are grown without chemical pesticides, thoroughly cleaned and tested to ensure they’re free from harmful bacteria and other harmful pathogens to allow the beans to sprout successfully.
- Filtered water. Unfiltered tap water contains heavy metals and other contaminants which can prevent beans from sprouting. It is easy to filter your tap water at home with a water filter (UK Link/US Link).
Please see the recipe card at the bottom of this post for the full detailed ingredient list.
Equipment Needed
- Tea towel
How To Sprout Chickpeas At Home
Step 1
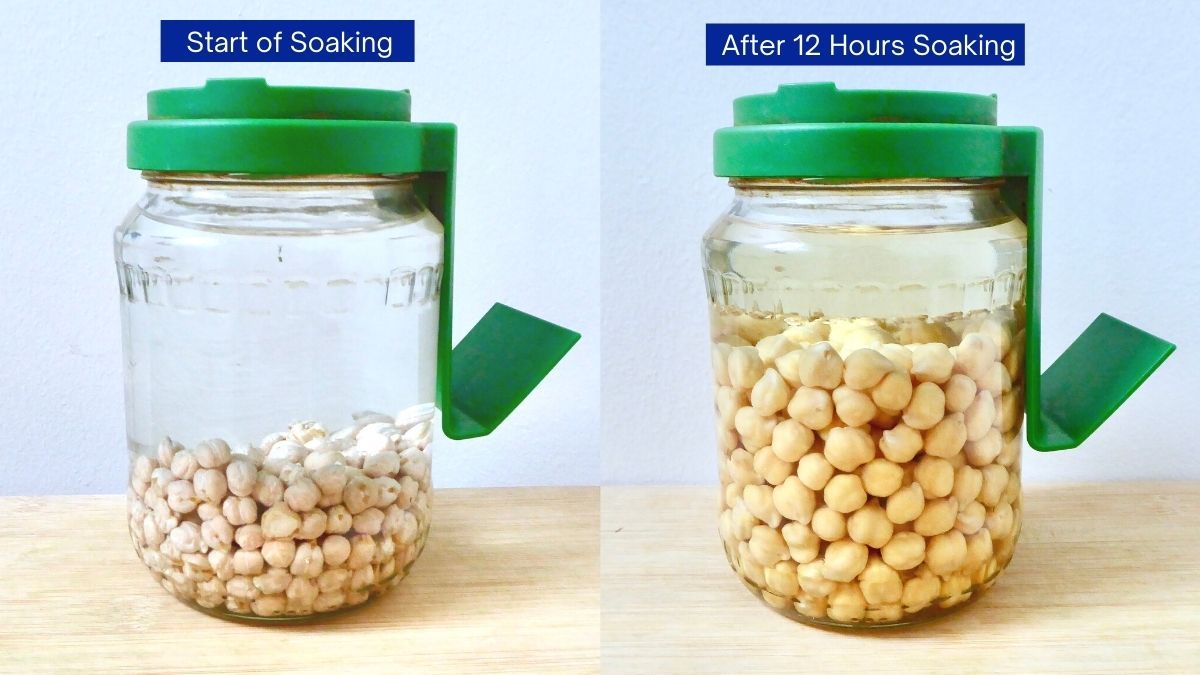
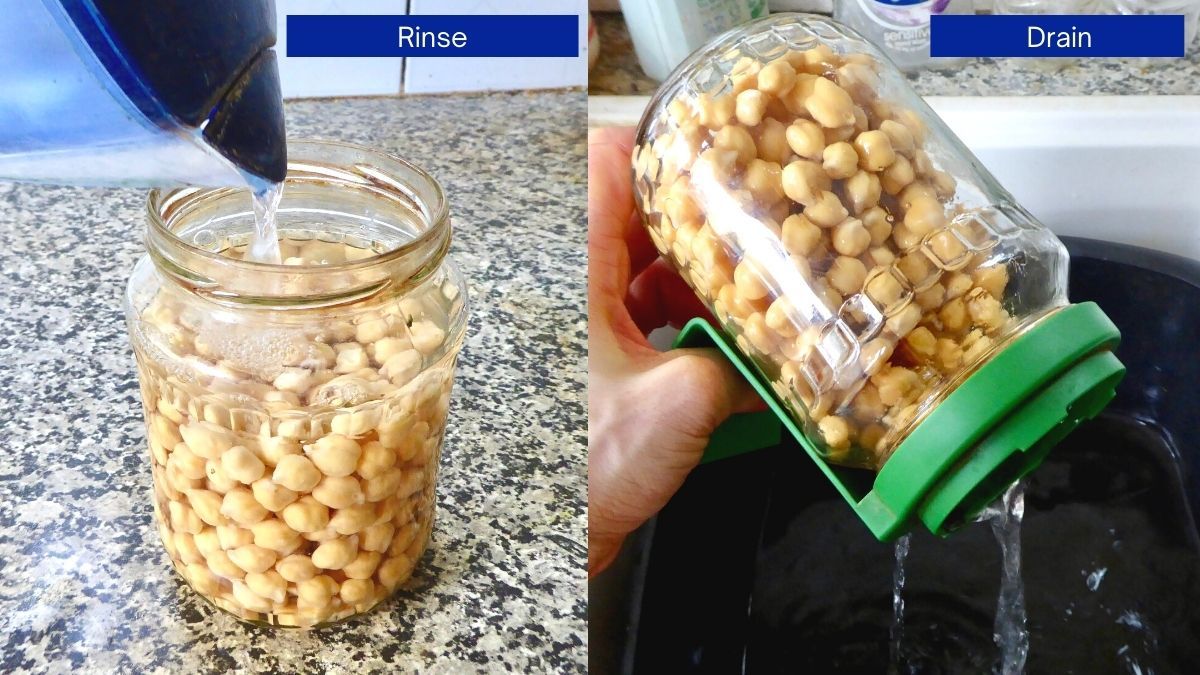
Add the chickpea sprouts to a sprouting jar and fill the jar with filtered water so the chickpeas are covered. The chickpeas will increase in size as they soak so ensure you fill the jar to make sure they stay covered throughout the whole soaking time. Leave to soak for 12 hours.
Step 2
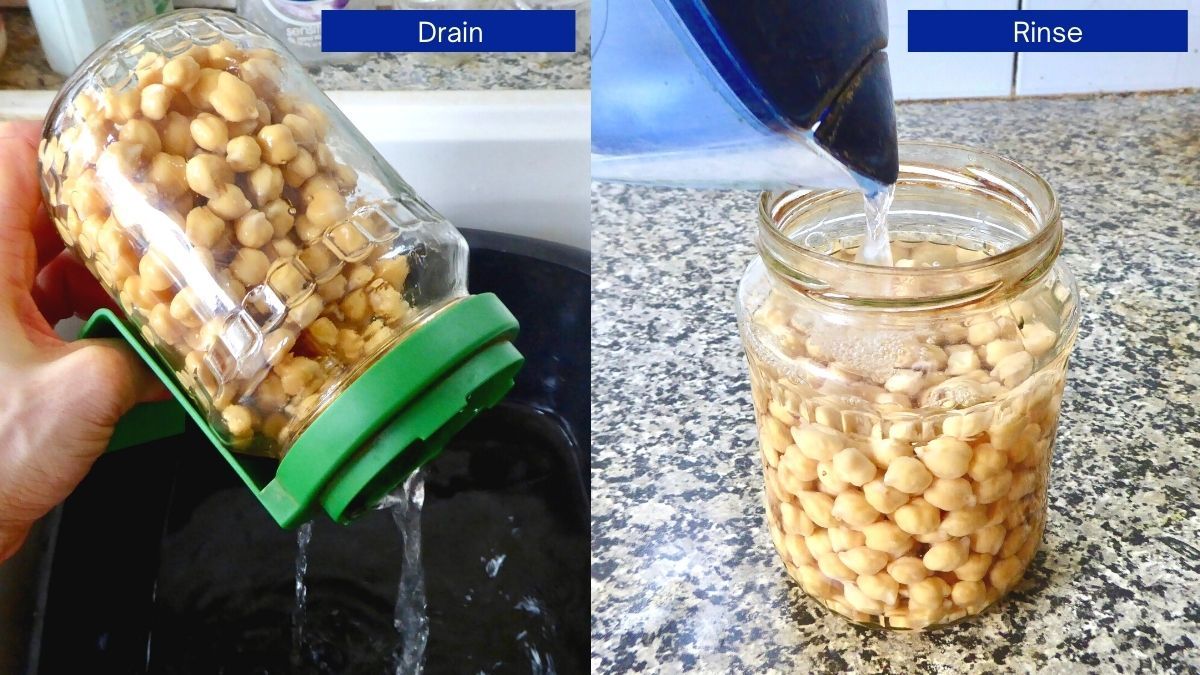
After 12 hours, drain the water, then rinse by filling the jar and draining it completely again.
Step 3
Leave the chickpeas in a sprouting jar at room temperature inverted on a drip tray to allow any water to drain. Cover the sprouting jar with a tea towel.
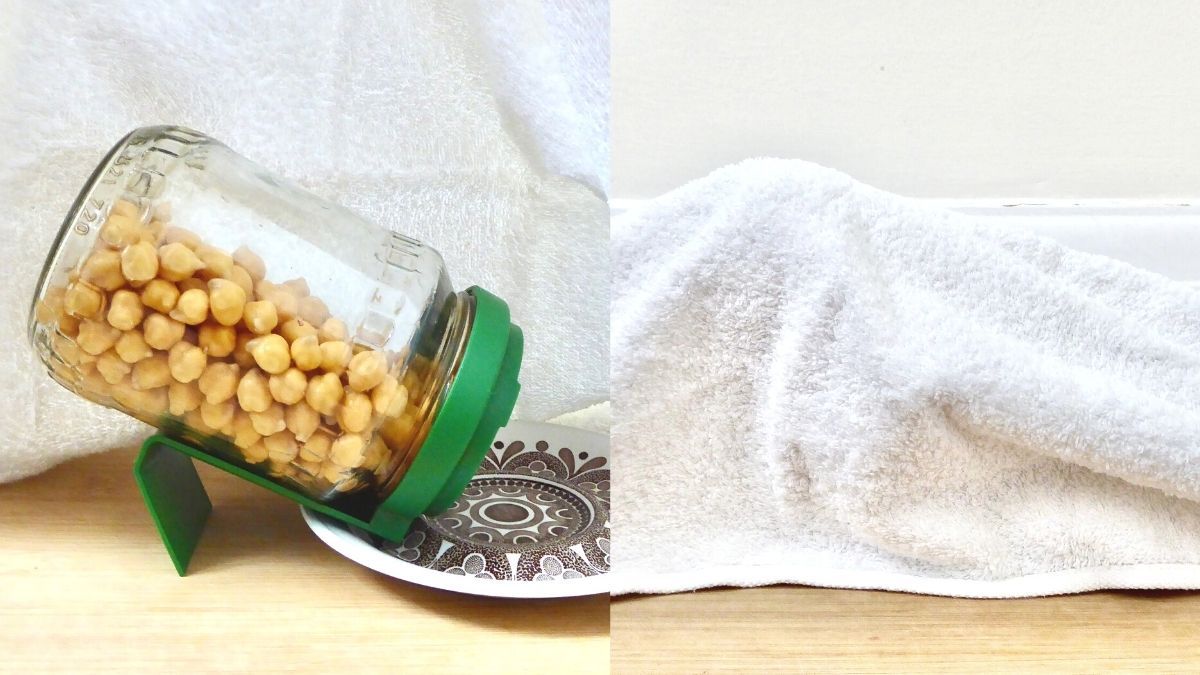
Step 4
Rinse and drain the chickpeas twice per day (I find first thing in the morning and in the evening the best and most convenient times).
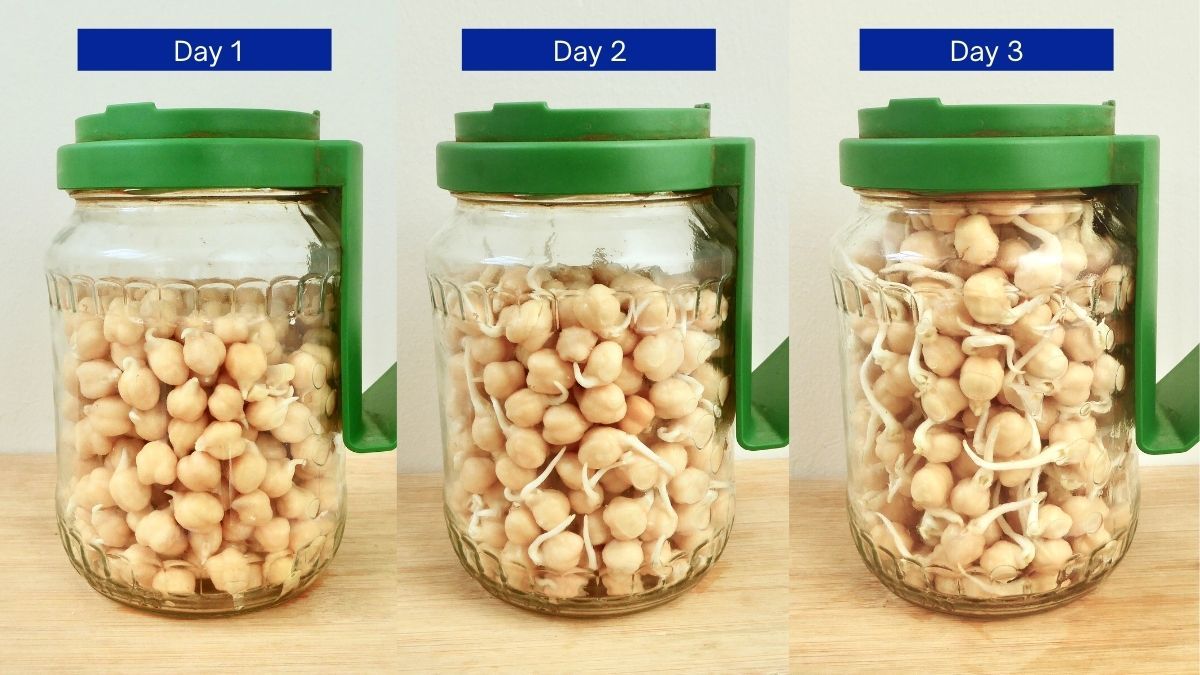
Step 5
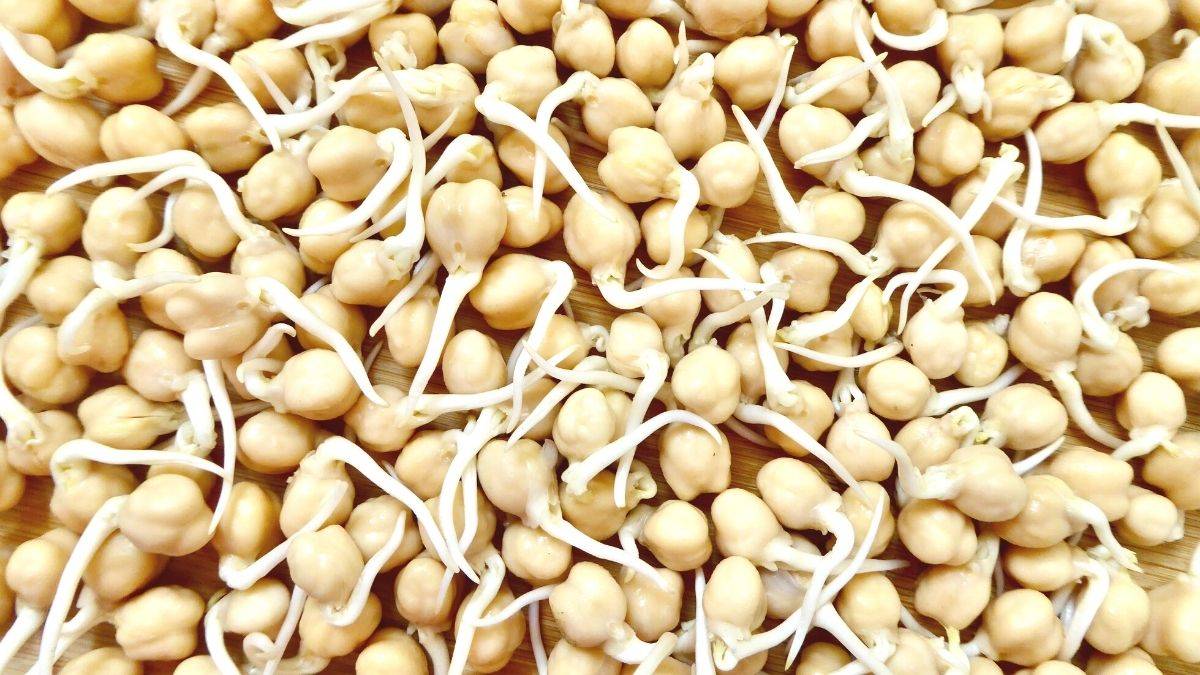
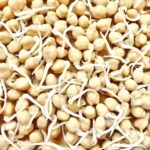
Sprouted chickpeas are ready in 2-4 days, when a white root has grown from the top of each one that is at least 1/4 inch long. They will sprout quicker in warmer weather and slower in colder temperatures. It’s recommended to not sprout them longer than 4 days as they will begin to turn mouldy.
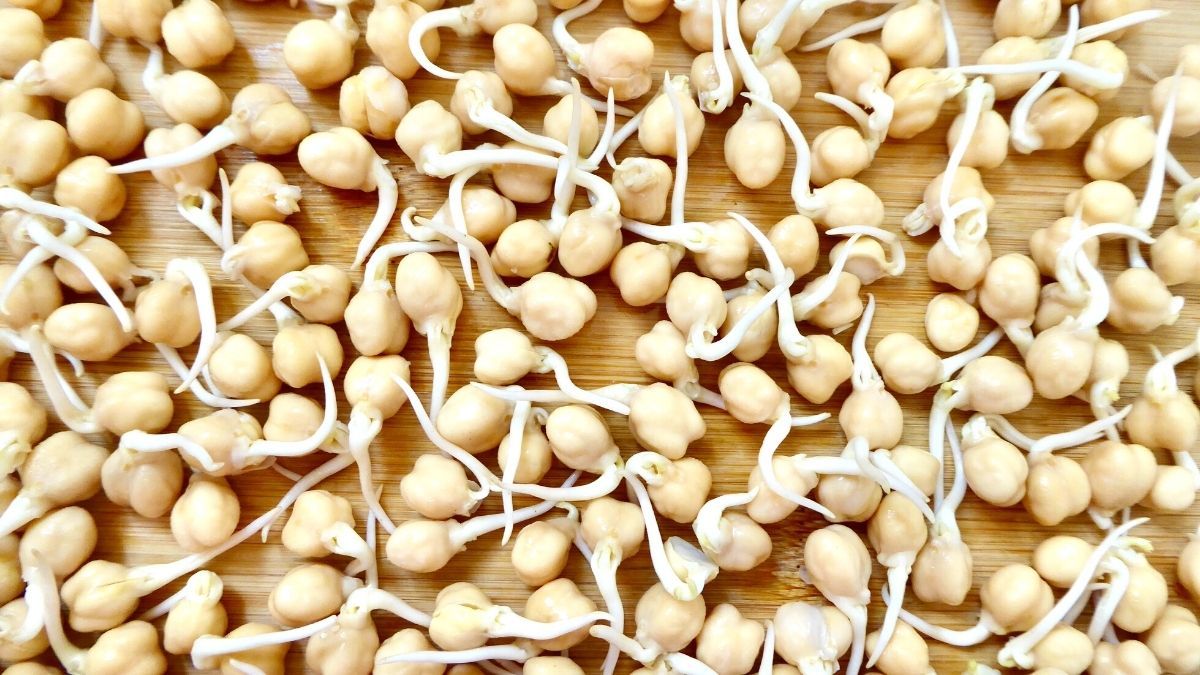
After a final rinse and drain transfer the chickpeas to a tray lined with a tea towel or unbleached kitchen towel to dry completely. Remove any unsprouted chickpeas.
Step 6
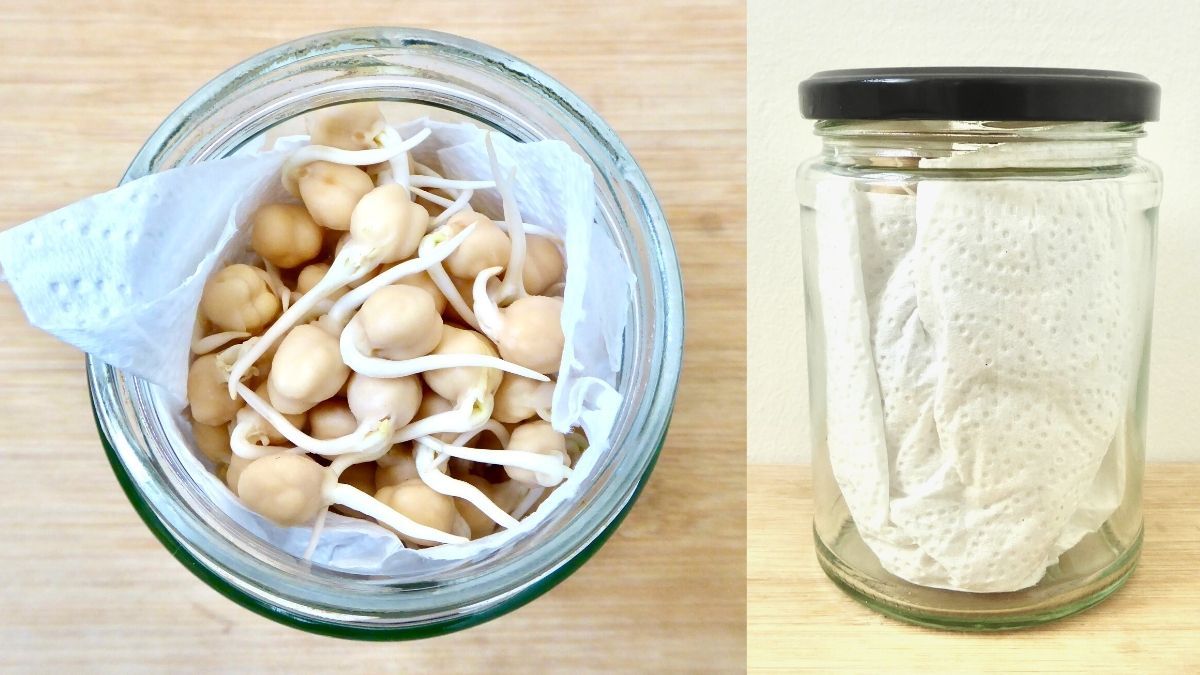
Once dry, either eat straight away or store in the fridge in a glass container lined with a paper towel for up to 3 days.
Lining the jar with a paper towel absorbs any moisture from the fridge which keeps the sprouts fresher for longer and minimises the risk of any mould developing.
Clean the sprouting jar thoroughly with cold filtered water and distilled vinegar then dry and it’s ready for you to start sprouting your next batch.
Every 1/2 cup/90 grams of unsprouted chickpeas produces approximately 2 cups/240 grams of sprouted chickpeas.
Tips To Sprout Chickpeas Successfully
- Drain and rinse the chickpeas thoroughly each time. When draining, tip the jar at different angles to allow the water to fully drain each time you rinse them.
- Use filtered water for soaking and rinsing. Heavy metals and other contaminants in regular unfiltered tap water can prevent sprouting from occurring. A brita filter (UK Link/US Link) is a cost effective way of filtering tap water.
- Use organic chickpeas/garbanzo beans made especially for sprouting. Non organic regular chickpeas are grown with artificial chemical pesticides which can prevent sprouting from occurring. Chickpeas made especially for sprouting are organic, so free from chemical pesticides, have been thoroughly cleaned and have undergone testing to ensure they don’t contain harmful bacteria or other pathogens.
- Use fresh sprouting seeds. Using seeds before they have past their best before date means they’ll be fresher, which increases the likelihood of them sprouting successfully.
Uses
Chickpea sprouts can be used in a variety of ways. They make a delicious addition to any meal and can be enjoyed both raw and cooked.
- Raw sprouted chickpeas have a delicious crunchy texture that make a great addition to salads and wraps, like this Jackfruit Tuna Salad.
- Add them to curries, stews, soups, traybakes and nourish bowls.
- Use to make dips and spreads, like this Lemon Dill Hummus.
- Use to make burgers and falafels.
- Blend into pasta sauces.
Sprouted Chickpea Recipes
How To Cook Sprouted Chickpeas
As they can be enjoyed raw there’s no set time they have to be cooked for (6). Another benefit of soaking and sprouting them is that, if you do want to cook them, the cooking time is significantly shorter than unsprouted chickpeas.
On The Stove
Add the chickpeas to a large saucepan and cover with filtered water. Bring to a boil over a medium heat, boil for 10 minutes, then turn the heat down to low, cover the pan and simmer for 30 minutes or until tender and your desired softness and texture is reached. Drain the water then serve.
Instant Pot
Place the chickpeas in the pressure cooker and cover with filtered water. Use 1.5 cups/375 ml filtered water for every 1 cup/120 grams of chickpea sprouts. Pressure cook on manual high pressure for 10-15 minutes (the longer you cook them the softer and more tender they become), then allow the natural pressure release for 10 minutes. Release the remaining pressure then strain, rinse and serve.
Steamer
Either add the chickpeas to an electric steamer or place them in a steamer basket over a pan of boiling water on the stove. Steam for 10 minutes or until the desired softness and texture is achieved.
As A Substitute For Tinned Chickpeas
They can also be added to meals and used in recipes in exactly the same way as tinned chickpeas. Use 1 cup/120 grams of sprouted chickpeas for every tin of chickpeas.
Frequently Asked Questions
No, tinned chickpeas are already cooked which destroys the live enzymes in them, preventing them from being able to be sprouted.
Soaking and sprouting neutralises the anti nutrients allowing them to be enjoyed raw (6). However, it’s recommended for those with a weakened immune system, pregnant women, the very young and the elderly to always cook sprouted beans until they are piping hot before eating them (7).
Sprouted chickpeas have a nutty earthy flavour similar to unsprouted and tinned chickpeas. The biggest difference is in the texture. When eaten raw, sprouted garbanzo beans have a crunchy texture. However, when cooked, the texture is very similar.
Changes in the colour, texture and smell indicate the sprouts have gone bad:-
– The white tails turn brown.
– Black, brown, grey or green marks appear on the pods.
– Instead of a hard exterior, the sprouts have begun to go soft and soggy.
– They develop a strange, foul, unpleasant smell.
If any of these signs develop the batch of chickpeas should be discarded straight away.
It’s not advised to freeze them as once defrosted their texture changes and they become soggy.
Other Sprouted Recipes
Contact Me & Follow Me On Social Media
If you sprout chickpeas, I’d love to know how they turned out. Leave me a rating and comment below and contact me on social media – I’m on Instagram, Facebook, Twitter, Pinterest & YouTube and use the hashtag #lbhealthandlifestyle.
Recipe Card
How To Sprout Chickpeas (Step By Step Guide)
Equipment
- Tea towel
Ingredients
- 3/4 cup chickpea sprouting seeds
- 2 cups filtered water or as much needed to fill the sprouting jar, plus extra for rinsing
Instructions
Soaking
- Add the chickpea sprouts to a sprouting jar and fill the jar with filtered water so the chickpeas are covered. The chickpeas will increase in size as they soak so ensure you fill the jar to make sure they stay covered throughout the whole soaking time. Leave to soak for 12 hours.
- After 12 hours, drain the water, then rinse by filling the jar and draining it completely again.
Sprouting
- Leave the chickpeas in a sprouting jar at room temperature inverted on a drip tray to allow any water to drain. Cover the sprouting jar with a tea towel.
- Rinse and drain the chickpeas twice per day (I find first thing in the morning and in the evening the best and most convenient times).
- Repeat this process for 2-4 days. Sprouted chickpeas are ready when a white root has grown from the top of each one that is at least 1/4 inch long.
- After a final rinse and drain transfer the chickpeas to a tray lined with a tea towel or unbleached kitchen towel to dry completely. Remove any unsprouted chickpeas.
Storage
- Once dry, either eat straight away or store in the fridge in a glass container lined with a paper towel for up to 3 days.
Notes
Nutrition

What an informative guide! As my kids homeschool, we have been learning about nutrition. We sprouted the chickpeas, and then we made a hummus. It was delicious! Thank you
Thank you very much Peter, I’m so glad you found the guide helpful, your chickpeas sprouted successfully and you all enjoyed the hummus.
Learned so much from you today. Your advice is amazing as always Lucy, thanks!
You’re welcome, thank you so much Natalie, I really appreciate your comment. I’m so pleased you found it helpful.